Unlike my usual posts on how something works, this post is a solution post. It presents a problem I recently had, and how I solved it. If you’re also interested in solving things, go ahead and read this, and maybe try to find a solution and compare your answers with mine. But the intended audience for this post is people who are trying to solve this problem.
I’ll start by describing the problem. I recently participated in a game jam with some friends. Here is our game, if you want to try it out. But on two computers, mine (Arch Linux), and a friend’s (oldish Mac), none of the assets would load. We were using Unity, with both our own custom asset files and TextMesh Pro assets, both of which failed to load.
So how did I solve this?
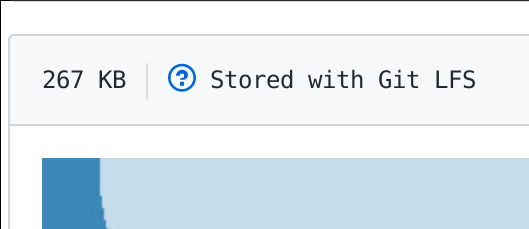
First I checked on the asset files themselves. At first I was worried they weren’t cloned correctly, and when I cated them I got this.
1234
$ cat Sunny\ Days\ -\ Seamless.jpg
version https://git-lfs.github.com/spec/v1
oid sha256:ab6536daf74188dfc075d65f5d85aca9efeaead7f03b905514e53076d854f365
size 273488
Well, that doesn’t look like what usually happens when you cat a jpg. Was it uploaded wrong? I went to the GitHub page for the file to check. But the image on GitHub looked normal. Well, with one added detail.
Stored with Git LFS. Clicking on the question mark took me here. Essentially, Git LFS, or Git Large File Storage, is GitHub’s way of storing large files. Rather than put the files where they appear in the repository, it stores them elsewhere and puts a pointer file in their place. You can read more about it here. But what does this have to do with solving the problem? Well now that we know the reason files look strange is because they are being hidden with Git LFS, we can use Git LFS to find them.
Unfortunately, Git LFS isn’t preinstalled, at least on some systems. Fortunately, it is at least on the AUR and homebrew. Weirdly enough, the package has to be downloaded manually on Debian/Ubuntu, but you can find the instructions for that here.
Once you’ve downloaded git-lfs, you need to install it. Just do it once with
1
$ git lfs install
Now Git LFS is installed! Any new repos you clone will clone large files properly automatically. Unfortunately, that doesn’t include current ones. Those require a bit of extra work. If you’re feeling lazy, you can just delete and reclone the repo. Otherwise, just type
12
$ git lfs fetch
$ git lfs pull
And you’re done! If you cat image files, you will be greeted with binary files and not plaintext. And now if you open up the project in unity, you will be able to use assets. Happy coding!
And here’s Part III of Analyzing an Open Source Project. Last time we started reading the install script of libinput-gestures (here’s the file we’re looking at, click to read along), and we haven’t sped up since. The goal of this blog is not to read open source projects, but to look at everything. Every. Single. Thing! There are plenty of tangents but you won’t be missing out on a single detail. So without further ado.
Now that we’ve set our cmd variable to the entered command and done our variable parsing, it’s time to use our variables. While the next things to look at are functions that will be run later, we’re going in execution order, so now we’re going to skip to line 147 where the script really starts happening.
libinput-gestures-setup
1
if[[$cmd== install ||$cmd== uninstall ]];then
Everything until the end is wrapped in this if statement and its corresponding else. This is a typical example of a bash if statement, and contains no surprises. It can be read with knowledge of any other programming language, or even English. Simply put, the if statement checks the truthfulness of what’s in the double brackets. Single brackets could also be used. While double brackets have less surprises and are more smoothed out, single brackets are a POSIX standard and therefore more portable. Because double brackets are a bash extension, they do require the user to learn a little more, but most of that is intuitive or googleable. But if you code, you can generally choose which one you want to use.
The contents of the if statement are exactly what they seem. $cmd == install returns, well, if $cmd is equal to install. The reason == is used instead of -eq is because -eq is for numbers and == is for strings.
At first I wanted to say that || worked differently in bash based on the fact that is often used outside of scripts. It’s common to write function || error, where error will run if function returns an error (manifested by a non-zero value, in contrast to most programming languages, though this makes sense because many bash scripts use their number outputted as the error message). However, instead of working differently in and out of conditionals, || works exactly the same, though it is often used differently. It goes to the first value, sees if it’s true or not, and continues until something is true. It then returns if it is able to find a true statement or not.
Realizing that in bash || is more commonly used outside of conditionals than in them, I wondered if it were true in other languages. In perl, if a function might error, it’s common to write code similar to function() or die, where if the function fails the die command is run with an optional error message. But what about other languages, where || is usually confined to conditionals? Well, I opened up a python shell.
Note: Psyduck, Penn, Muack, and Blob are my stuffed platypodes. They are very cute.
It seems that instead of one line if statements, and or or operands with error messages could work as well. In fact, I may start using them to shorten my code. But back on topic. After the brackets are closed again, a semicolon stands in place for a newline, which is followed by a then, which says that everything after should be executed. Then is needed because if statements don’t need to be confined to just one set of brackets (and in fact can have any amount of brackets from 0 to infinity, with any number of things stringing them together). Now that the then is in place, we can finally analyze the if statement. Let’s look at it’s first line.
libinput-gestures-setup
1
DESTDIR="${DESTDIR%%+(/)}"
Last time we determined that DESTDIR is by default "" but can be set to any directory with the -d argument. We also covered substitution, which tells us that everything after the %% containing exactly +(/) is removed. Because this substitution is extremely specific and doesn’t contain a common case, I believe it is an artifact from testing.
Next we have another if statement.
libinput-gestures-setup
1234
if[[ -z $DESTDIR&&$(id -un) != root ]];thenecho"Install or uninstall must be run as sudo/root."exit 1
fi
I’m going to avoid repeating myself and not discuss anything previously discussed. For the if statement to trigger, two conditions must be met. First, -z checks if something is null, so $DESTDIR be an empty string. Second the output of id -un must not be equal to root. id is a function that gives information on users, with -u giving only information on the user running the command and -n giving the user’s name. So id -un will only output root if the user is running the script as root. Therefore, the if statement will only trigger if $DESTDIR is an empty string (in this case representing the root directory) and if the user is not root. Essentially checking if the user is trying to build the directory in a place they have access to. If the user doesn’t have access to the directory, the script will exit with an error.
However, this method of checking is not perfect. If the user tries to build in a non root directory they don’t have access to as non root (and this sentence is why you shouldn’t give a person and a place the same name), this error checker wont trigger.
One smarter thing would be to check if the user is not root and not the owner of the file (admittedly this leaves out groups and everyone-can-edit directories, but those are really edge cases). The command stat gives information on the file, and its --format argument allows it to display only certain things. When --format is set to "%U", it only prints out the user. So put together.
1234
if[[$(id -un) !=$(stat --format="%U""$DESTDIR/")&&$(id -un) != root ]];thenecho"Install or uninstall must be run as sudo/root."exit 1
fi
Because apparently six lines merit a whole entry, that’s all for today. But on the bright side, I actually wrote some code. And I got to plug my stuffed platypodes. Keep reading and you might get a picture. But that’s all for today.
Here we begin Part II of Analyzing an Open Source Project. For Part I, which deals with setting up and looking at a makefile, click here. The open source project I’m analyzing is libinput-gestures, and this part begins looking at the setup script. Click here for the code. To keep each article from getting too long, the setup script will require multiple articles. This part will focus on getting the program name and article parsing.
Some things start off with a bang, but libinput-gestures-setup starts off with a shebang. So we know that the script is meant to be run in bash, but what else do we know? Well, just like us, the script starts by trying to learn more about itself.
libinput-gestures-setup
12
PROG="$(basename $0)"NAME=${PROG%-*}
The argument $0 is the name of the command or script that is run. For example, the $0 for ls -l is ls. The command basename strips away both the path to the file and the file extensions. So if you were to call libinput-gestures/libinput-gestures-setup or even ./libinput-gestures-setup, it would take away the first part, making $PROG result in libinput-gestures-setup.
In bash, a % means to remove what comes after it from the suffix. And since what comes after it is -*, meaning the - and everything after it are removed, making $NAME become libinput-gestures. For some interesting and related facts, while % removes everything after the the last instance it finds, %% removes everything after the first instance. While % and %% deal with suffixes, their prefix equivalents are # and ## (however, this time ## looks for the last instance). And finally, it is an absolute pain to google the symbol %. Yes, even with quotes.
Great! Now we’ve gotten through two lines of code! Wasn’t that exciting? Well, now we’re going to skip around a bit. Don’t worry, well cover everything we missed. But first, let’s zoom out for a second. The setup script allows for two command line arguments, -d and -r. -d takes and argument, which is used to determine the destination where everything is installed. By default, it’s empty and causes everything to be installed in children of the root folder, but the script does give you the option to specify. You probably shouldn’t need to if you just plan on installing, but it’s good to have options. The -r argument force allows root to perform user commands, and is not recommended. For a more in depth look at these commands, keep reading my blog. Until then, let’s look at how arguments are actually parsed.
libinput-gestures-setup
1234567891011
DESTDIR=""FORCEROOT=0
whilegetopts d:r c;docase$c in
d)DESTDIR="$OPTARG";; r)FORCEROOT=1;;\?) usage;;esacdoneshift$((OPTIND -1))
The first two lines are simple, they’re setting the defaults of variables that may or may not be overridden later. But the third is where things get interesting. Given that many bash functions take in arguments of the form -a test -b, there needs to be a builtin to parse them. And that’s what getopts is. It’s used in a while loop (or for each loop, whichever helps to visualize it better) to make sure that every option is parsed, as the loop will run for every option. Now let’s look at the first argument, d:r. The script’s two arguments, -d and -r are present, with -d, which takes an argument, on the left, and -r, which does not, on the right. The second getopts argument, c, will be filled with the argument the user uses. At the same time, if applicable, the builtin $OPTARG will be filled with the argument’s argument. For example, if the user types in the command ./libinput-gestures-setup -d place -r, the first pass of the while loop will fill $c with d and $OPTARG with test, and on the second pass $c will fill with r.
Now that we know $c is being filled in with something, the question is what we can do about that. And the answer is a case statement. Interestingly enough, the case command’s man page calls it obsolete and says it should be replaced by switch statements. Though case statements seem far more popular online. In this particular case, the programmer probably doesn’t need to switch, but it’s something to keep in mind.
Once you get past the confusing getopts syntax, case statements are fairly readable. The syntax checks what $c is against d, and if so sets $DESTDIR to $OPTARG, which holds -d’s argument. All case statements are terminated with two semicolons. Similar is the case for r. If an illegal option is called, the case \? will trigger. This calls the function usage, which outputs the script’s usage as text and then quits with an error. After the case is chosen, the case statement will end with esac.
Why esac? To slightly paraphrase this answer, the case/esac convention, as well as if statements ending in fi, comes from ALGOL68. Both the original sh shell and ALGOL68 have, the same author, Stephen Borne. One of the influences sh took from ALGOL68 are the case/esac and if/fi openings and closings. ALGOL68 also has do/od as a pair, but od is already a keyword in bash (octal dump), so that was scrapped in favor of done.
This leaves us with one final line of code, shift $((OPTIND - 1)). Of the statement above, this part is the most enigmatic. If you google around to understand getopts, you’ll find that this part is usually ignored. You don’t achieve anything by modifying it, and it’s something you put at the end no matter what. So, what does this command actually do, and how does it work?
Starting from the beginning, the variable $OPTIND, short for option index, is part of the getopts utility. When getopts runs through the command line argument, like a for each loop, it needs something to look at next. At all times, the next argument for getopts is stored in $OPTIND. How does this work so easily? $OPTIND isn’t actually storage, but a number. Remember, $1 in bash will get you the first argument, $2 the second, and so on. So $OPTIND starts at 1 and is incremented with each pass. If you run the program with 3 arguments, $OPTIND will end as 4.
In bash, double parentheses evaluate an expression, and a $ in front of them returns the result as a statement. So shift is being called on the result of $OPTIND - 1. shift is a command which shifts the position of arguments to the left by the number given to it as argument. That is, if you run shift 2, the variable that used to be referenced with $4 can now be referenced with $2. Because $OPTIND is always one more than the number of optional arguments, shifting by $OPTIND - 1 will make the main arguments always be in the same place. So for example calling ./libinput-gestures-setup -d place install and ./libinput-gestures-setup install will both lead to install being $1 after the shift happens.
The next function is fairly simple.
libinput-gestures-setup
123
if[[$# -ne 1]];then usage
fi
The program wants you to input only one main command, in this case start, stop, restart, autostart, autostop, or status. If you give it a number of commands that is not one, it will display the usage. The program checks if you are giving it only one argument (after the shift), with [[ $# -ne 1 ]]. Double square brackets surround a statement. -ne compares two numbers to see if they are not equal, in this case $# or the number of arguments, and 1. So if the number of arguments is not equal to one, the usage function is triggered. Otherwise, you can proceed on to
libinput-gestures-setup
1
cmd="$1"
Whatever the main command is, it’s stored in the argument $1. So now the script knows what you’re trying to do, and sets it as the $cmd variable.
That’s all for this entry, but keep reading to find out what’s next. Check out this blog next time for more exciting code. In either way you interpret that sentence.
Early one morning my friend Jake texted me about playing Stardew Valley that night. I immidietly agreed, but was soon faced with a problem: my desk was currently full, leaving me unable to use my mouse. I don’t usually work at my desk or use my mouse, as I favor the trackpad, but Stardew Valley is very hard to play without one. So I looked at my options. Finding a place to use a mouse was sub optimal, as was using the trackpad, but there was one thing I could do: using a controller. Which led to one more problem: the only controller I actually had was a 3DS. Well, not to worry, right? I’d used the 3DS as a console to play Smash before, and I’d heard rumors about the 3DS as a controller on Linux. So, I imminently got to work, setting up my 3DS as a controller for my computer.
A few software notes: My 3DS is homebrewed. A quick glance at the source code suggested that homebrew isn’t necessary, but I can’t comment if it is. I originally did all of this on my computer, which runs Arch, but when writing this shortly after the fact, I tested it on Debian, both to ensure that I wasn’t forgetting anything and to make sure this guide wasn’t Arch only.
After a bit of googling, I decided on this repository, called ctroller. There was one other, but this had the prettiest readme. One thing to keep in mind about the repository is that it has two parts. One for the Linux side, which has a server that interprets data sent from the 3DS into a device on the system, and the 3DS side, which builds a 3DS application the 3DS uses to send the data. Well, now that I had a repo, it was time to build all the things.
First, on to the Linux side of things. The repository tells you to install the AUR package ctroller-git, which couldn’t be installed, or ctroller-bin, which could. Then I just typed in make install and it worked perfectly. That was easy. Going off of this it should be smooth sailing for the rest of the setup, right?
The next step is to get the 3DS files on your 3DS. You can either download them or make them yourself. Personally, I only use locally-sourced, grass-fed, vaccine-free binaries. So obviously I was going to build them myself. So I followed the instructions and went into the 3DS folder.
12
$ make release
Makefile:6: *** "Please set DEVKITARM in your environment. export DEVKITARM=<path to>devkitARM".  Stop.
Alright, let’s go up to the part in the repository where it tells us about DevkitARM. Wait– why doesn’t this link have any file?
So a bit of googling got me here. And because entering random commands is what I do to keep life exciting, I entered the following into my computer (the page contains information for multiple operating systems, but I followed the instructions for Arch). For a more in depth explanation of what happened, follow the link. The next 3 code blocks are for Arch, but I’ll get to other distributions in a second.
Because this blog was written slightly after the fact, and to ensure accuracy was tested again on a Debian VM. Distributions based on neither Debian nor Arch should probably follow the instructions on linked page, but will look a lot like this. The first part downloads a .deb binary I found here, but you can find instructions for other distributions on the main page.
Alright, we got one thing working. Now let’s run make release again. And… seems like we’re missing bannertool. Fortunately, this is one problem the AUR can fix. Less fortunately, it seems like for any other operating system, we’re dealing with a repository with a vague makefile and no readme. Usually a makefile gives some clue as to how to run it, and this makefile certainly gave a clue: it got its pattern from a file in a subfolder.
The only problem? That subfolder was the submodule for a different Github repository. The submodule didn’t copy over when cloning, but fortunately you can able to manually fix it by deleting the buildtools folder and cloning the linked buildtools repo instead. Now I just had to type make, and at least I got an executable out of it, even if it was hidden in the output/linux-x86_64/ folder. Here’s the executed code, for reference.
1234567
$ git clone https://github.com/Steveice10/bannertool
$ cd bannertool/
$ rm -rf buildtools/
$ git clone https://github.com/Steveice10/buildtools
$ make
$ ls -F output/linux-x86_64/ # -F will give executables a *, among other thingsbannertool*
So we’ve got an executable. What to do with it? Well, nothing yet. My gift of foresight tells me that the executable will have a twin before we’re done. And where do we find this twin? Well, the original repository says to have both bannertool and makerom in your $PATH. And we already have an executable for bannertool, so now we need one for makerom. Following the link for the repository, we end up here.
Anyone who clicks links before reading ahead will notice two things: first, that we aren’t even in the head of a repository. We’re in a subfolder of a repository with an entirely different goal. And second, the readme only links to a site which definitely does not contain installation information. We’re back to running unidentified makefiles. At least this one gives less of a fight, all you have to do is clone the parent repository, cd into the makerom folder, and type make. And thus an executable is born. Reference code below.
12345
$ git clone https://github.com/profi200/Project_CTR
$ cd makerom/
$ make
$ ls -F makerom # -F will give executables a *, among other thingsmakerom*
So now we have the two executables we need. Now we just need to put them in our $PATH. There are probably a lot of ways to do this, but keep in mind when I had to get this done, I was doing it after a fair amount of figuring things out. I was tired. So this is what I did.
For those of you who can’t or don’t want to read what I just did, I essentially made a new folder, added the two gained executables to it, and then added it to my $PATH variable. This is probably not advised, but in my defense, it worked.
Now, if we run make release again in the 3DS folder, it works. The 3DS files are generated. We can rest. Almost.
Now, all you have to do is plug in your SD card into your computer. There is an upload script mentioned by the repository, but I didn’t test it. Once the SD is in the computer, you need to create a directory called ctroller in your sd card’s root directory, and then you should put ctroller.cfg in it. ctroller.cfg should contain your computer’s IP address instead of the default. You can find your ip address many ways, but it will be listed under $ ip addr. You should also put ctroller.cia on the SD if your 3DS is homebrewed, and ctroller.3dsx if it isn’t (or install the actual program however you usually transfer programs onto your 3DS).
Now, the hard part is over. Before you run the server on Linux, you need to run $ modprobe uinput, and to run it you need to run the actual executable ctroller file, probably with $ ./linux/ctroller. Now that you have the server running on your computer, convert the cia to a program or install it like any other program and run it. Then make sure your computer and 3DS are on the same network. You’re done! You can now use the 3DS as a controller for your computer!
To review the controller, it normally works just fine. However, it does go through periods of lag, where commands pause for a little while and then execute all at once. I would not recommended using the controller for a game with any stakes, but it works fine for Stardew Valley. Except when your internet goes down for a minute (hi Spectrum). But it’s worth it to say you’re gaming with a 3DS as a controller.
I’m probably one of the only Linux users who really likes gestures. Going back a web page and switching desktops with a swipe of my fingers is really easy and convenient. But when I switched to Linux, I found the support ridiculously lacking. It took a week of searching and trial and error to finally figure out how to implement gestures, at which point I stumbled upon libinput gestures, which finally did solve my problem. Now that I have a solution (and a fair amount of time has passed) I want to work on a project: documenting open source. But not just going over the functions, but going extremely in depth and looking at EVERYTHING that happens.
This guide won’t just show off what happens to make gestures work, but will talk about everything along the way. While the actual code is written in python, this part will only focus on bash and make. Essentially, the things you have to run yourself to get libinput-gestures working. For an in depth analysis of the code, look for later parts. Because this code is based on the libinput-gestures code, you should familiarize yourself with the README and Makefile before or during your reading. Now let’s get started.
No matter where you go to do your gestures, you’ll encounter the same command before you start:
1
$ sudo gpasswd -a $USER input
To understand this command, first you need to understand groups. Though they are commonly come across, they don’t get much attention. If you chmod a file to 764, you’re saying that the group is given permissions associated with 6 (reading and writing). The middle 3 characters when you use $ ls -l say the permissions the file’s group has when modifying it. Every file has not just a user who can access it, but a group. While said group is often just the user, that’s not always the case. In this case, we’re dealing with a series of files that can only be accessed by the group input.
The command gpasswd is used when administrating groups. The argument -a adds a user to a group. So $ gpasswd -a $USER input adds $USER (which is your username) to the group input. This is important because the group input has access to the files /dev/input/event* (as well as /dev/input/mouse*, though this is less important for gestures). So what is the point of this?
You may have heard the saying “In Linux, everything is a file.” Well, that includes input devices. And if you’re going to treat physical files like devices, you need to include that actual files for the devices. These are said files. These files, whose type is character files, are essentially pipes between physical inputs and what the computer receives. Although they are simply labeled event followed by a number, running the command $ xinput list will tell you exactly which event pipe corresponds with which device. In this particular case, the only file necessary is the one for the trackpad. Exactly how the code interacts with the device will be discussed in a later entry.
Now that you’re allowing the user access to the input devices, you can actually install libinput gestures. Here we shift from looking at bash setup commands to looking at the makefile itself, and what it contains.
Immediately running $ make install is the easiest way to set up gestures, but that is neither the only way to set up functions nor the only way to use the makefile. Starting with the latter, the makefile includes make all, which tells you to run make install or make uninstall, which run the install script that will be covered next entry, and make clean, which cleans. The makefile also includes two more slightly more interesting rules, which I’m going to discuss in detail because their code is interesting. The first, make doc, is as follows (including all of the relevant code but leaving out everything else):
The interesting part of this command comes not from the content, but the presentation. But what it actually does is fairly simple. The command markdown converts a text file to html. The make variable $< gives the name of the first prerequisite, in this case $(DOC), which is defined earlier as README.md. The second variable, >$@, is a little more complex. Any variable prefixed with > means that if it involves a file, that file will be overridden, rather than appended to. And $@ takes in the target of the rule, in this case $(DOCOUT). $(DOCOUT) takes in $(DOC) (still README.md) and performs a substitution reference on it, substituting .md for .html. So essentially $(DOCOUT) is equivalent to README.html. Put together, all of this means convert to markdown README.md, outputting with override to the file README.html. Or, in simplest terms, converting the README from markdown to html.
The second rule, make check is less stylish or hard to read, but it’s no less interesting. Instead, its uniqueness comes from its content. The rule is as follows:
This is pretty standard make. The interesting part comes with the make code. The first line just does exactly what it says, running the command $ flake8 libinput-gestures. flake8 is a command that tests for proper conventions in python code. This check fails, as line 533 is longer than 80 characters. I don’t know why the developers included a check if they don’t intend to use it themselves, but if anyone is looking for an easy pull request, they can have one. The second line is similar in that it checks shell scripts for errors and bad code, though it differs in that the code passes the check. It also includes an argument -e which tells it to exclude the errors corresponding to the codes listed after it. In short, the allowed forms of bad code are redundant logic, double double quotation marks, not double quoting expanding variables, using \n rather than \\n, using read without -r, running then checking exit status in two steps, unused variables, not using a directive to specify the location of a source file with a variable location, and not checking to make sure a path variable isn’t empty. The conclusion that can be drawn from this is shellcheck has a lot of different types of errors. I’m not sure if this is intentional or laziness, though there are a lot of fixable errors if shellcheck is run to allow these errors (though some do seem justified in the code).
So which shellcheck errors are justified? And what happens after you actually type make install? How does libinput gestures actually work? Find out next time on my blog.